By Adrienne Barrett
This post is by guest blogger Adrienne Barrett, who’s a senior mathematics and education dual major at Rowan University. She is currently student teaching and upon graduation in May, she hopes to find a full-time position teaching high-school mathematics. She’s always loved math, and studying it in college has given her a greater understanding of just how intricate and fascinating the subject is. She says, “I’ll forever consider myself a student of math because I believe that there are always new methods, representations and concepts to be explored.”
While searching for topics for my senior seminar project last semester, I came across a theorem known as Morley’s Trisector Theorem, discovered in 1900 by mathematician Frank Morley. It states that given any triangle the points of intersection of adjacent angle trisectors are the vertices of an equilateral triangle. The fact that performing a seemingly arbitrary action, such as trisecting angles of a triangle, produces a nontrivial shape—an equilateral triangle—fascinated me. I was hooked and I had to know more about this theorem.
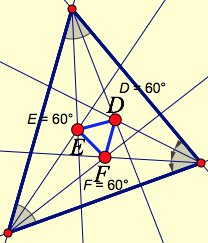
By trisecting each of the interior angles of a triangle, you can find their points of intersection: the vertices of the First Morley Triangle. Below is a web sketch that will allow you to create and experiment with Morley triangles. (If you get confused, watch the short video beneath the sketch.) Click the top tool (Morley1) to create a triangle with one interior angle already trisected. Drag each glowing vertex in turn, moving the triangle wherever you desire. Then drag the slider at the bottom of the sketch to rotate the trisection rays into position. To trisect a second angle, click the top tool again and drag the glowing points onto the existing vertices in a way that trisects a different vertex. Use the tool once more to trisect the third vertex. Then drag the slider again (just because it’s fun to animate the trisection), leaving the angles fully trisected.
With the angles fully trisected, use the Point tool to construct the trisector intersections closest to the sides of the triangle. (Click the tool, drag the glowing point to an intersection point, and release it when both trisectors light up. Repeat for each of the other two intersections.) These are the vertices of the First Morley Triangle.
Choose the Measured Triangle tool and drag its vertices onto the intersection points. You have now created the First Morley Triangle. What do you observe about its angle measurements? I encourage you to drag the vertices of the original triangle, as well as the slider, while you observe the behavior of ∆DEF.
If at any time you want to undo one or more tools you’ve used, just press the left arrow above the tool icons.
Pleased as I was with this pretty picture, I had more in mind. Through my research I discovered that this is not the only result Morley’s Theorem provides. The First Morley Triangle is determined by the intersections of the trisectors of the interior angles of a triangle. But what about the reflex angles?
Morley’s Theorem also addresses this. Press the arrow button at the lower right of the sketch to go to page 2, which you can use to create the Second Morley Triangle. Using the second tool (Morley2), create a triangle with three trisected reflex angles. Once you have trisected all three angles, adjust the vertices, making the triangle small enough that you can see the more distant trisector intersections. (These intersections are located on the dashed lines that extend the trisectors, and are NOT the intersections closest to the sides of the triangle.)
Now use the Point tool to construct the trisector intersections, and use the Measured Triangle tool to create the Second Morley Triangle.
Take this one step further on page 3. We know that rotating a side of an angle about its vertex by 2π leaves it right back where it started—but the resulting angle’s trisectors would be in different places. That’s what the Morley3 tool does; it trisects the reflex angle, with an extra 2π added in. Use the Morley3 tool to trisect the reflex angles (with the extra 2π thrown in), and then (as before) use the Point tool to construct the intersections and the Measured Triangle tool to measure the angles of the triangle formed by the intersections. (This time the intersections are again close to the sides of the original triangle.)
While this tool adds 2π to the reflex angles being trisected, it is also possible to obtain the Third Morley Triangle by adding an extra 2π when trisecting the interior angles of the original triangle.
It is worth noting that up to this point, you have explored three equilateral triangles that are the result of Morley’s Trisector Theorem. The equilateral triangles that were created were done so using trisectors exclusively of one type: interior, reflex, or interior plus 2π/reflex plus 2π. While doing my research for my project and playing around in Sketchpad, I was impressed with these results. What fascinated me was what happens when you use combinations of different types of trisectors on the same base triangle. The result is that more equilateral triangles are formed! Naturally I spent an inordinate amount of time in Sketchpad creating my own triangle with all of its Morley triangles. There are 24 more triangles to be found that are equilateral and I encourage you to hunt for a few. Happy exploring!
Hey this is a pretty cool theorem!
It took me a bit to figure out which intersections made up the Morley triangle, but when I did, lo and behold, equilateral. Some of the other triangles you can make are deceptively *almost* equilateral, most of the time.